Over the years, I have spent a lot of time integrating SharePoint into Power Apps. Getting the basic setup complete is fairly straightforward, but going with the Out of Box options leaves a lot to be desired.
Leveraging some hard-earned lessons from different implementations, I wanted to put all of that knowledge together so that if you are at the beginning of your SharePoint integration journey, that this can serve as a good step-by-step guide across the various intersects between Power Apps and SharePoint.
“Integrate SharePoint with Power Apps” doesn’t mean one thing. There are nuances between model-driven apps, Power Pages, Canvas Apps or Power Automate Flows. The steps are scattered across a dozen docs pages, and the gotchas usually aren’t written down anywhere until you trip over them. So I figured I’d put it all in one place.
Why SharePoint instead of just Dataverse
Cost
SharePoint storage is cheap, and Dataverse capacity is not (to be fair, Microsoft has steadily bumped up the default capacity included with most licenses over the years, so there’s more headroom than there used to be, but it still fills up faster than you’d think).
Pushing your documents to SharePoint keeps your premium capacity for the data that actually needs to be there.
User Experience
Your users likely already know SharePoint. And just because your files are in a Power Apps context, it doesn’t mean that you don’t need things like co-authoring and version history. Additionally, files are reachable outside the app to users who may not have a Power Apps or Dynamics 365 license. Lastly, it is an out of the box integration.
That being said, SharePoint integration is not without trade-offs. Permissions get more interesting, and each product has its own quirks, but those are exactly the things this series is going to dig into.
What this series covers
Because “SharePoint integration” looks different in each corner of the platform, one post was never going to cut it. Here’s the roadmap. I’ll link each one up as it goes live:
Model-Driven Apps: turning on the built-in document management experience and what it gives you.
Power Pages: surfacing SharePoint documents to external, portal-facing users.
Power Automate: handling files with flows when you want full control over what happens and when.
Canvas Apps: connecting to SharePoint and building your own file experience.
Advanced, multiple SharePoint sites: pointing one model-driven app at more than one site.
Advanced, custom folder structures: taking control of how folders get named and organized.
Advanced, syncing permissions: keeping access in Power Apps and SharePoint in step with each other.
What you’ll need to follow along
I’m going to assume you’re already comfortable poking around the Power Platform. To actually try any of this, you’ll want a SharePoint site to point at and enough admin rights in your environment to flip the integration on. Nothing exotic, but worth having ready before you dive into the hands-on posts.
Let’s get into it
First up is the one most people meet first: document management in a model-driven app. See you in the next post.
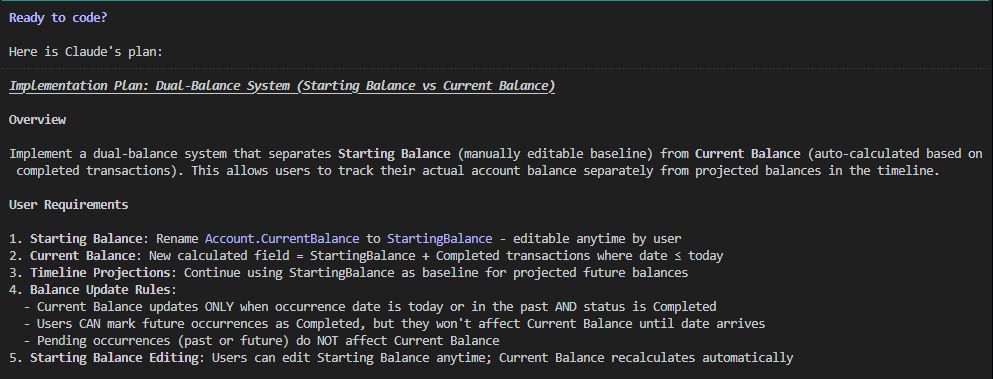
I’ve spent the last week diving headfirst into Claude Code, and I’ve gotta say, it’s been a wild ride. I went from being impressed by the basic “out-of-the-box” experience to building my own little crew of AI agents that has totally changed how I build software. It’s been a game-changer for the quality of the outputs and is saving me a lot of time and a lot of rework.
Key lessons learned
Agents and tasks take Claude Code from being a novelty to being a real partner.
Commit often. If something goes wrong, or you don’t like the direction that Claude Code is taking you, it’s a lot easier to start some changes over from scratch.
Compact often! When the session context gets full, Claude Code will auto-compact your context. While a necessary feature, it can cause important context to be lost, and the chance of rework increases.
The Honeymoon Phase
When I first fired up Claude Code, I was blown away. The speed was amazing. I could throw prompts at it, watch it map out a plan, and see code appear. There is just no way that I, or any individual can beat the development speed vs manual coding, and it has solidified for me that we are never turning back.
But it didn’t take long for me to figure out that just having a back-and-forth chat wasn’t going to cut it for bigger, more serious projects. I needed a better way to keep things organized and delegate work.
The .claude folder
After a lot of Youtube rabbit holes, and countless blog posts, it was apparent that my initial setup was subpar. Given how novel the technology is, I found it difficult to find out how to best create and orchestrate agents and to reduce the need for every action to be a prompt from me.
The answer, it turns out, was a lot more simple than I had thought.
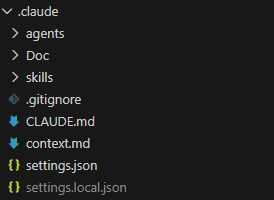
The .claude folder had everything I was looking for. Let’s take a look at the structure and how it helps to make the creation process easier.
Agents
The agents folder is a collection of .md files that define the various agents that you can use in a claude session. When you session loads, Claude scans the folder and if the markup is in the right format, it will make the agent available in Claude Code. To call an agent, just @ the agent name. For example:
@agent-architecture-agent Perform a comprehensive review of the project to date to ensure it aligns with the architecture plan
And here is an example of the header structure required for the agent to be picked up by Claude Code on start:
---
name: architect
description: Enterprise software architect for large-scale, internet-facing applications. Use when designing systems for millions of users, high availability, and zero-downtime deployments.
tools: Read, Grep, Glob, Bash, Write, Edit
model: opus
---
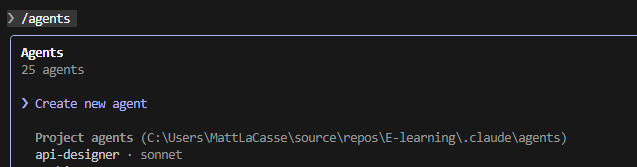
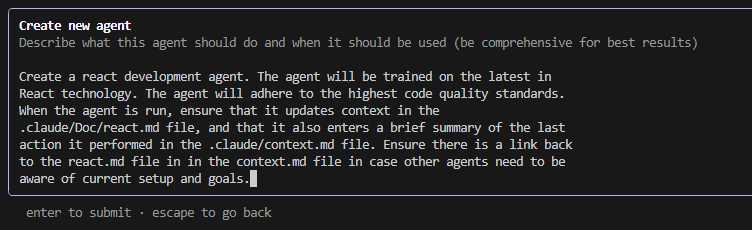
There are a couple of ways to speed the creation of agents. One would be by using the /agents menu, and then select Create new agent.
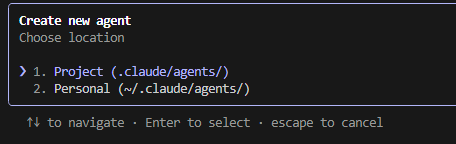
Next you will be prompted to select if this is a Project or Personal agent. A personal agent is available across all projects, where a Project agent is limited to the current project
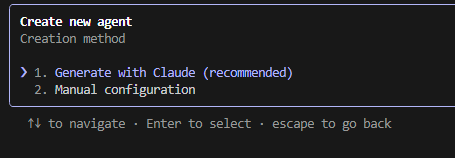
Next you will be prompted to either Generate with Claude, or manual configuration. I have only tried generating with Claude to date because, well it’s a lot faster.
Last, enter the prompt that will be used to generate the agent. Once you’re satisfied, hit enter to create the agent.
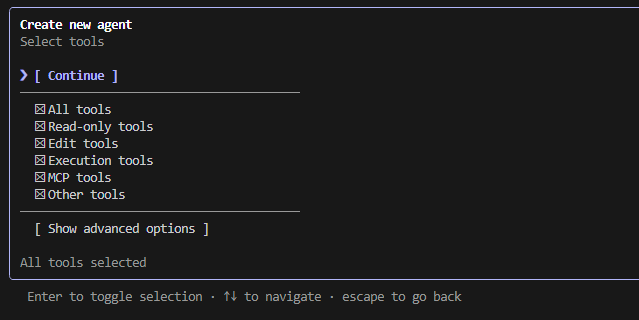
Next you will be prompted to select what tools are available to your agent. Choose what you are comfortable with, then click Continue.
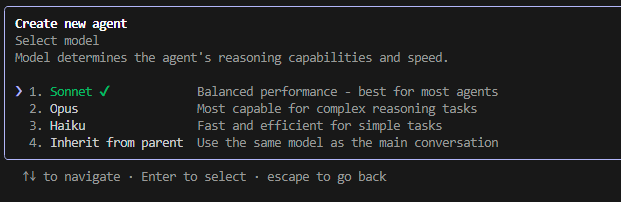
Then select the model you would like the agent to use.
You will then be asked to select a color for the agent, then review and confirm the details of the agent. Then you’re done!
Skills
Claude skills allow you to quickly call repetitive functionality using the /skill-name convention. For more info on creating skills, check out the Claude Documentation.
Automating the agents and skills creation process
You could go through and create every agent and skill manually. But I found it was a lot more convenient to just prompt Claude Code to create the folder structure required, and start with a prompt like this.
Create a .claude directory. The directory must contain agents and skills that will support the creation of enterprise scale applications. The agents and skills must always keep in mind strict security requirements, adherence to international data protection legislation such as GDPR, CCPA, PIPEDA, and other applicable legislation. Assume that security issues and downtime with the resulting application could result in loss of revenue, regulatory action, or legal liability.
You may need to tinker a bit with the resulting agents and skills but it will get you going out of the gate.
The new creation process
As mentioned above, my projects now start with me setting up my crew and giving them a shared “docs” folder to keep their notes. Each agent has its own file to track its work, and they all chip in on a shared context.md file, which is basically our team’s daily stand-up report.
My go-to roster of agents usually includes:
An Architecture Agent to think about the big picture.
A Front-end Dev Agent for the UI.
A .NET Agent for the back-end stuff.
A Security Agent to keep things locked down.
A UI Design Agent to make it look good.
Test Writer & Runner Agents to make sure things actually work.
As far as the skills that I have implemented, my go-tos have been for commits and security checks. But my absolute favorite is my “orchestrate” skill, where I can just line up the agents I need, give them a goal, and watch them go to work as a team.
My New Game Plan
Here’s what my project kick-off looks like now:
Figuring out what I want: I start by chatting with my Requirements Agent. It’s like a brainstorming session where it helps me flesh out my ideas and even suggests new features I hadn’t thought of.
Drawing the blueprints: The Architecture Agent steps in next to make sure the app will be scalable, secure, and built on a solid foundation.
Planning the UI and Data: The UI Agent and Database Agent then work together to plan out the user experience and how the data will be stored.
Designing the API: The API Designer takes the data model and writes up the specs for the API.
Building the Backend: My .NET Agent grabs the API specs and starts building out the backend.
One small step at a time: From there, I build out the rest of the app one small feature at a time. This keeps things manageable and lets me test as I go.
So, What Did I Build?
I used this exact setup to start building an e-learning app for the Power Platform community. It’s a pretty hefty project with user accounts, course catalogs, progress tracking, and admin panels. Because I live in Canada, I had to make sure it complied with GDPR, CCPA, and PIPEDA. I told my agents this from the very beginning, and they factored it into everything they built, including a detailed audit log.
The Good, The Bad, and The Human
The results have been awesome. My Security Agent has been a lifesaver, catching issues with how I was storing JWTs and suggesting things like rate limiting to prevent attacks.
But it’s not all magic, and you definitely still need a human in the driver’s seat. One of those moments was when the agent implemented IP-based API rate limiting. I realized that if 20 people from the same office were using the app, they’d all get locked out. It was a classic case of the AI being logical but lacking real-world context. It’s a great reminder that these tools are here to help you, not replace you.
The Biggest Change for Me
Honestly, the biggest shift has been in my own mindset. I’ve gone from being a hands-on coder to more of a manager. I delegate tasks to my AI team, review their work, and provide course corrections along the way. It’s like being the conductor of an orchestra instead of playing every instrument yourself. It’s freed me up to focus on the more creative, high-level parts of building software.
My first week with Claude Code showed me that the real power isn’t just in the AI itself, but in how you organize it. By building a team of agents, I’ve created a development process that’s not just faster, but smarter and more robust.
As a Power Platform developer, there’s nothing more frustrating than deploying a solution to a new environment, only to find that it doesn’t work as expected. You’ve tested it thoroughly in your development environment, and everything works perfectly. But in the new environment, it’s broken. What’s going on?
More often than not, the answer lies in the unmanaged layer.
Unmanaged layers can cause problems when you’re moving solutions between environments. If you have unmanaged changes for components in your target environment, and you import a solution with those same components in a managed solution. your app will not show the configuration for the components from the managed solution because component changes at the unmanaged layer veto the configuration at the managed layer.
Even with robust DevOps procedures, unmanaged configurations can still pop up due to user error, inheriting a solution before robust controls were in place, etc.
TLDR: How to remove unmanaged changes
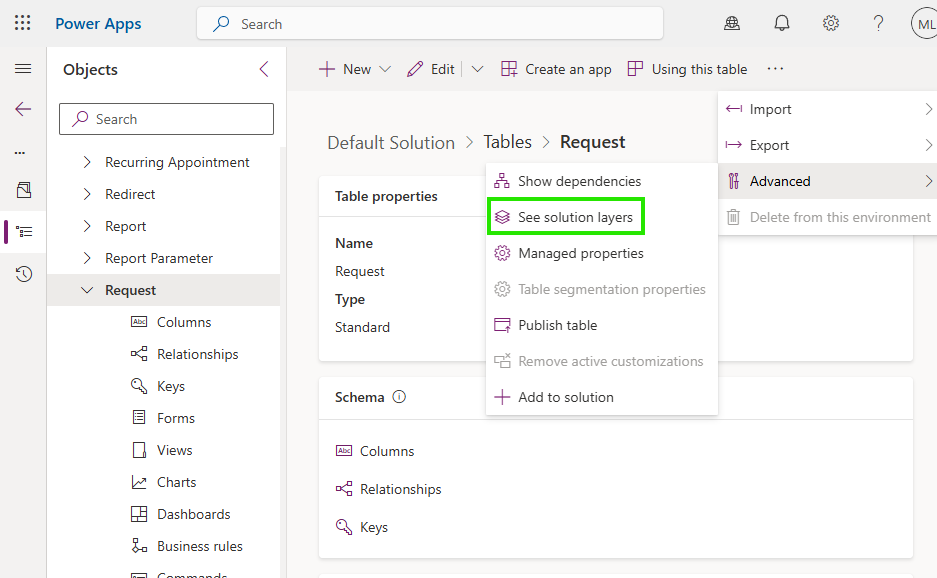
In your solution, find the misbehaving component, and click Advanced -> See Solution Layers
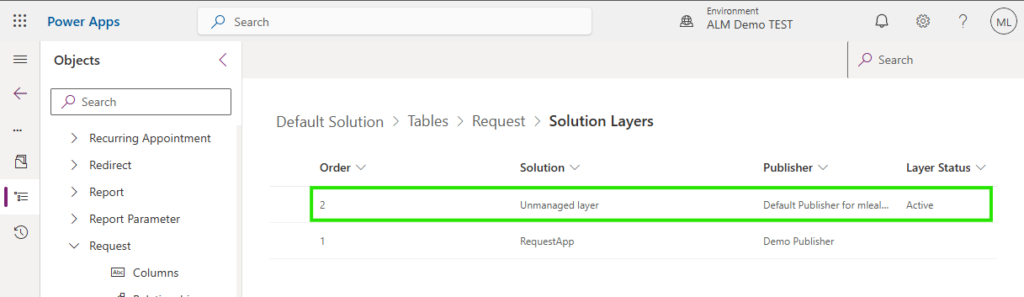
If there is an unmanaged layer, it will appear in the next window.
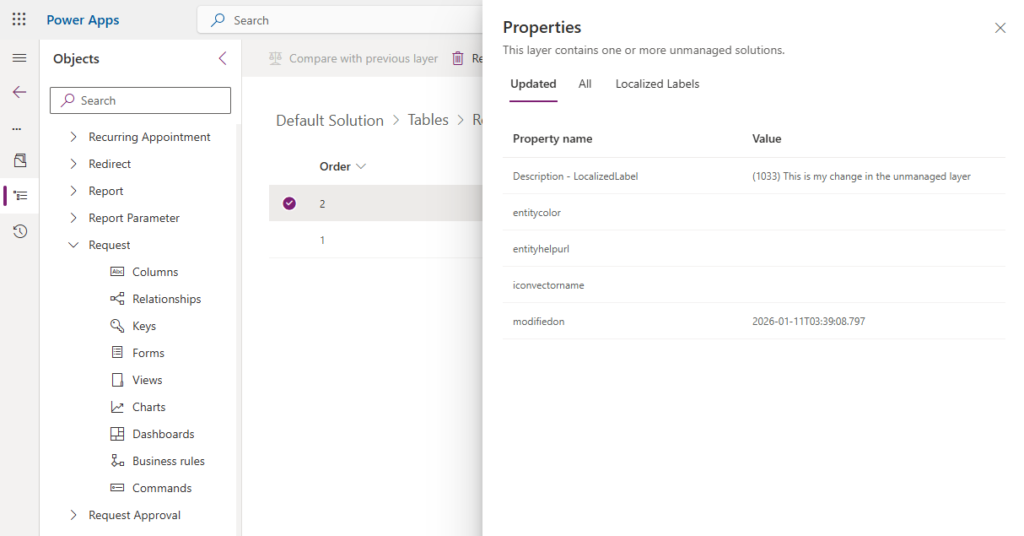
If you click on the layer, it will show you what has changed for that component in the unmanaged layer.
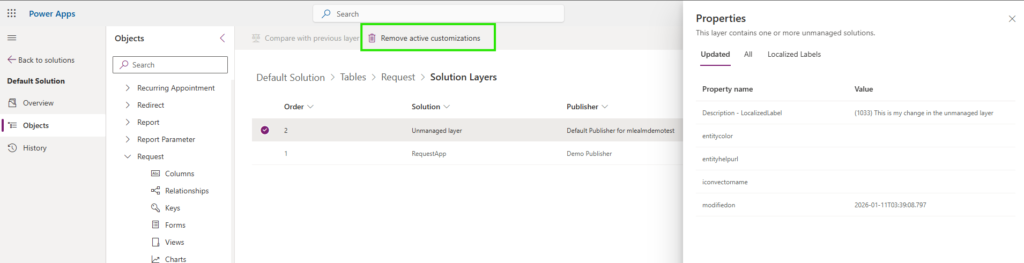
To remove the unmanaged customizations, simply click the Remove active customizations buttons.
Deep Dive – What are the Managed and Unmanaged Layers?
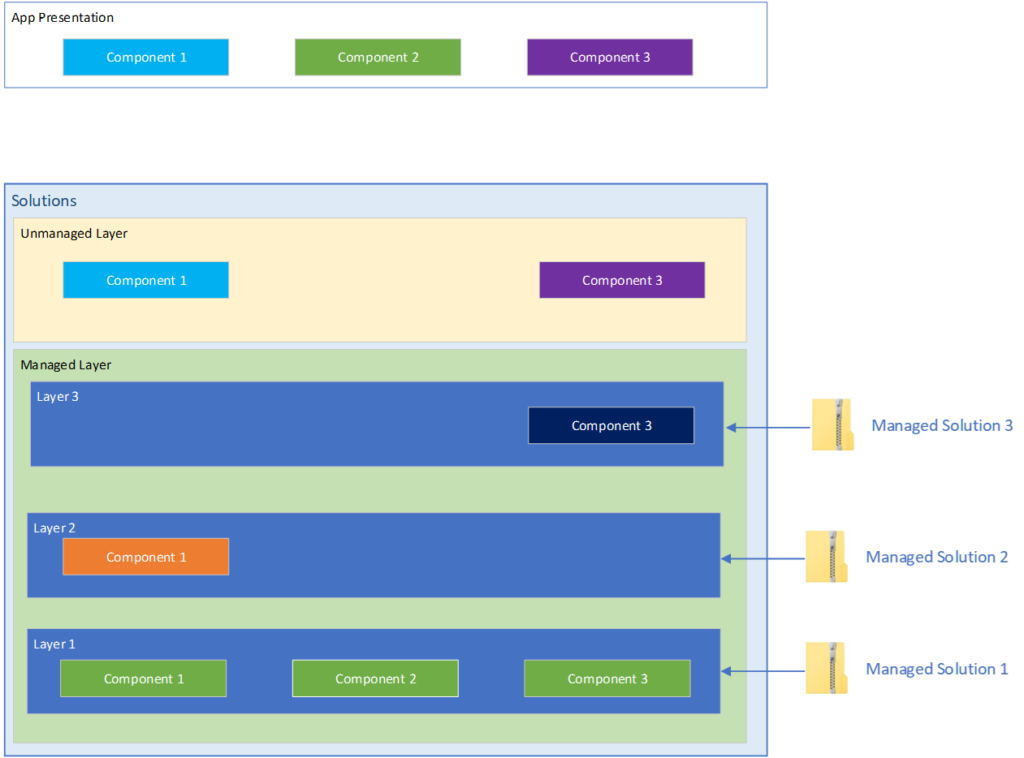
To illustrate this concept, let’s suspend everything we know about the Power Platform, and let’s pretend that the only type of component available is a rectangle component.
Let’s also pretend that the only attribute available for the component is a colour. Not very practical for apps, but very practical for demonstrating layers.
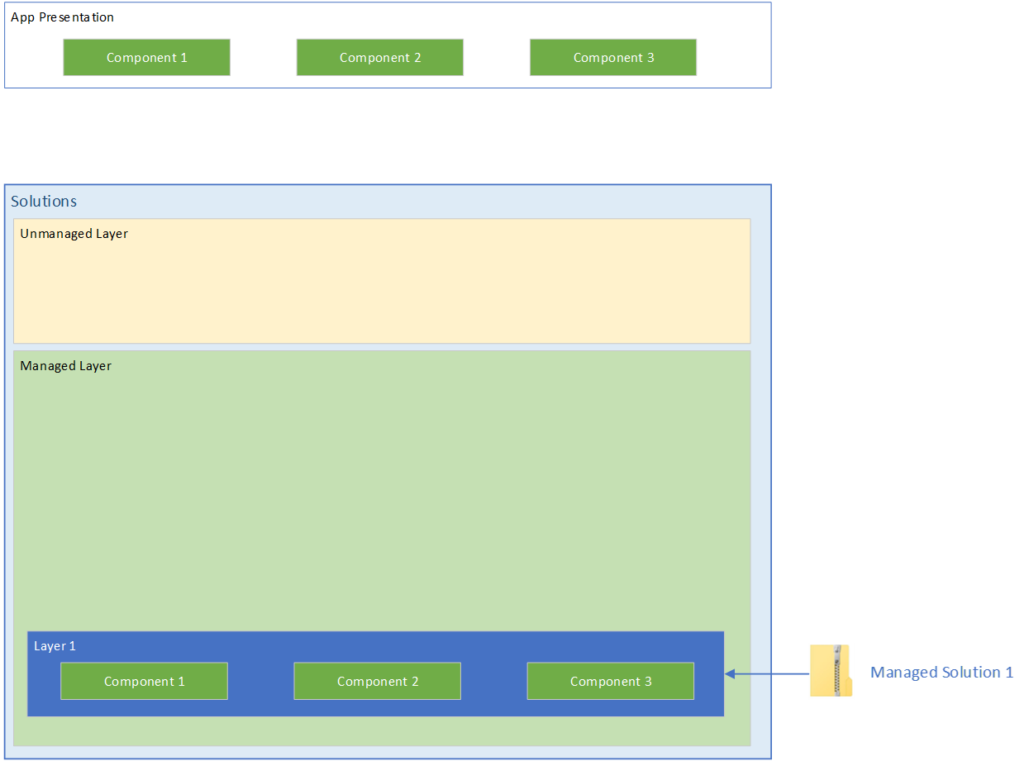
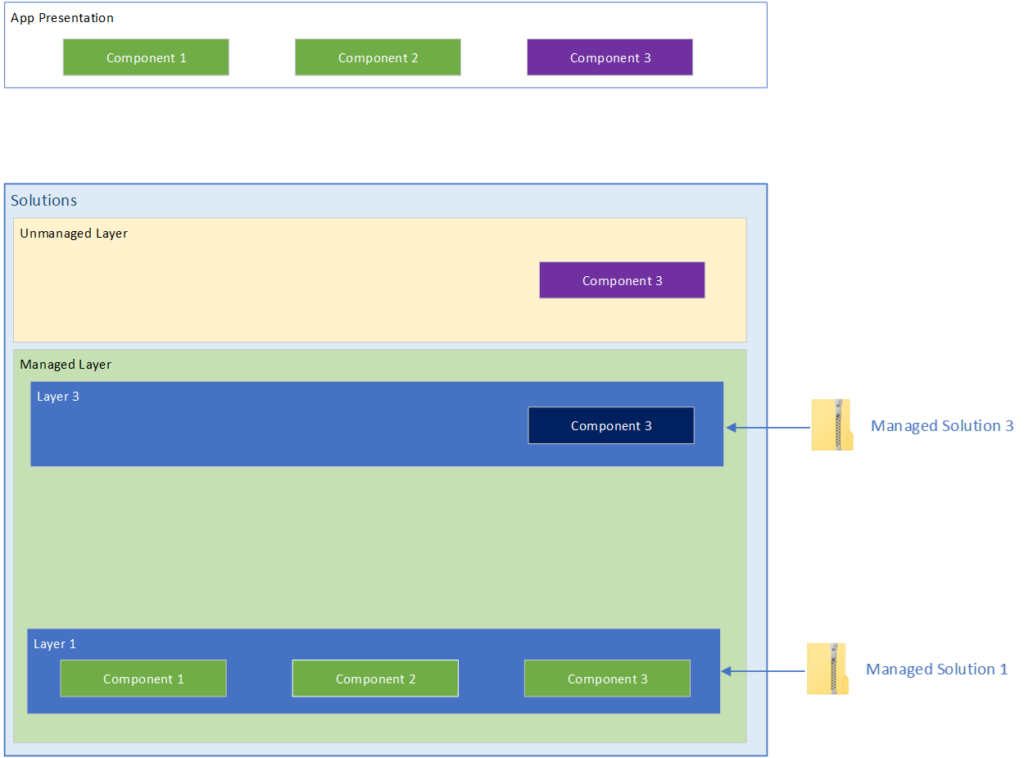
One managed solution in an environment
In the illustration above we have a Managed solution that has been in our environment. Inside of the managed solution there are three components.
As this is the only solution in this environment, you can see in the App presentation that the three components are green. So what happens when we start adding more solutions to this environment?
Adding another managed solution
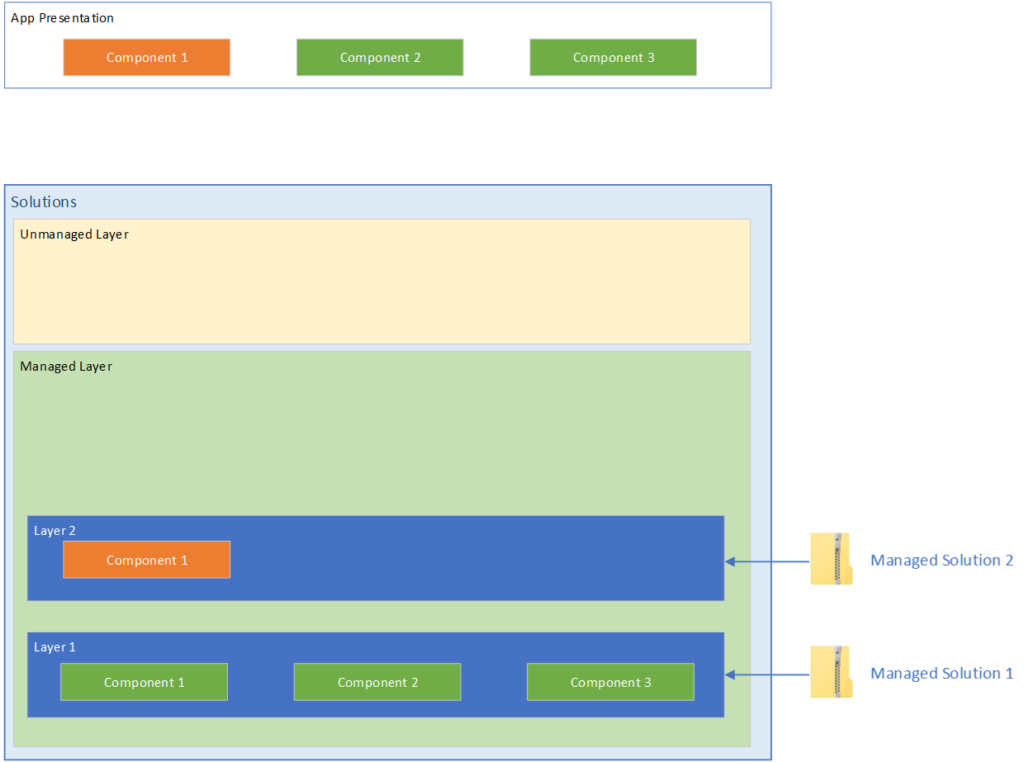
Let’s see what happens when we add a second managed solution
A second managed solution
We can see the the second managed solution was added containing another copy of Component 1 with a different color attribute. And in the App Presentation, we can see that the color has changed to orange.
This teaches us a few key points about Managed solutions and Managed layers.
The way the power platform decides which component configuration to use is literally whichever one is at the top.
Solution layers are ordered by the import order of the solutions themselves.
And there are some not so obvious points
Once a solution layer is created, it does not move.
If you were to make a change to Component 1 in Managed Solution 1 and re-import it, because of the presence of configuration of that component in a higher level, the changes in Managed solution 1 will not be seen by the user.
The only way to have the configuration in Managed Solution 1 to become what is presented in the App, is to delete Managed Solution 2. Removing a managed solution also removes the associated managed layer.
This behavior will continue on and on with each new managed solution added to the environment. Configurations add up and the behavior of the app changes based on which one is on top.
Introducing the Unmanaged Layer
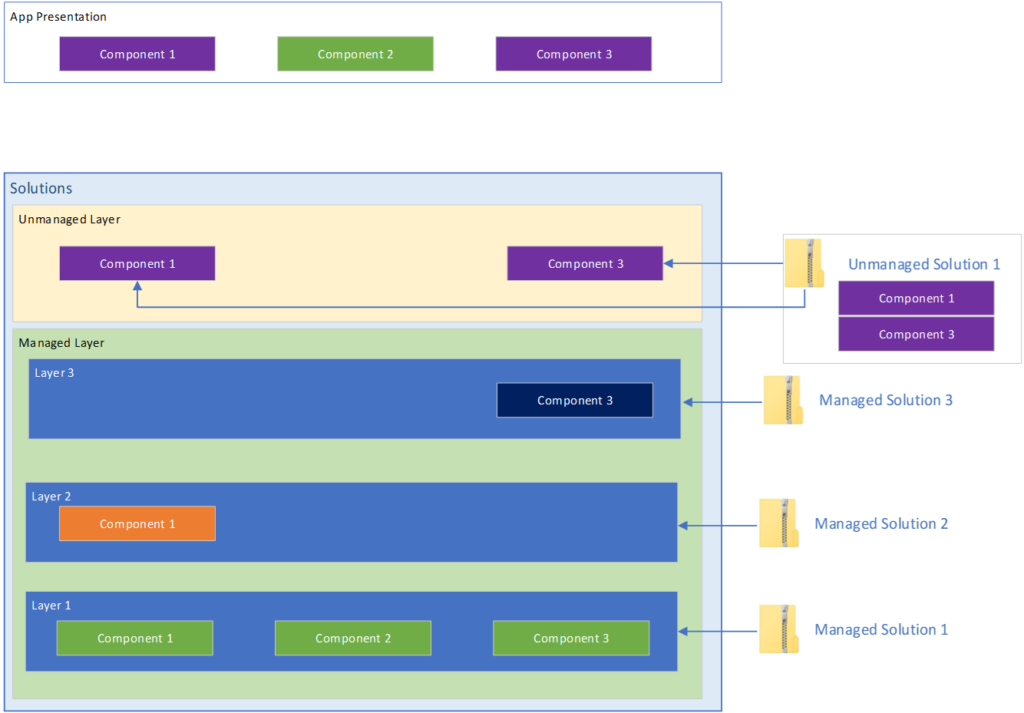
In this diagram we’ve introduced an unmanaged solution with configuration for some of our components. The Power Platform rules for taking the top most layer still apply here. And as you’ll note, the unmanaged layer is always above the managed layers. This tells us that configuration in the unmanaged layer will always override changes in any managed layer.
Introducing an unmanaged solution
The other important thing to note here is that where bringing in a managed solution, the system will create an independent layer containing a copy of the solution’s configuration, when you import an unmanaged solution, the platform just kind of dumps the components into the unmanaged layer. Instead of ownership over the components, you instead get a reference to the solution component in the unmanaged layer. The solution just points to that component.
This tells us that when we export our unmanaged solution, the system takes a Snapshot of the component’s configuration from the unmanaged layer and exports that.
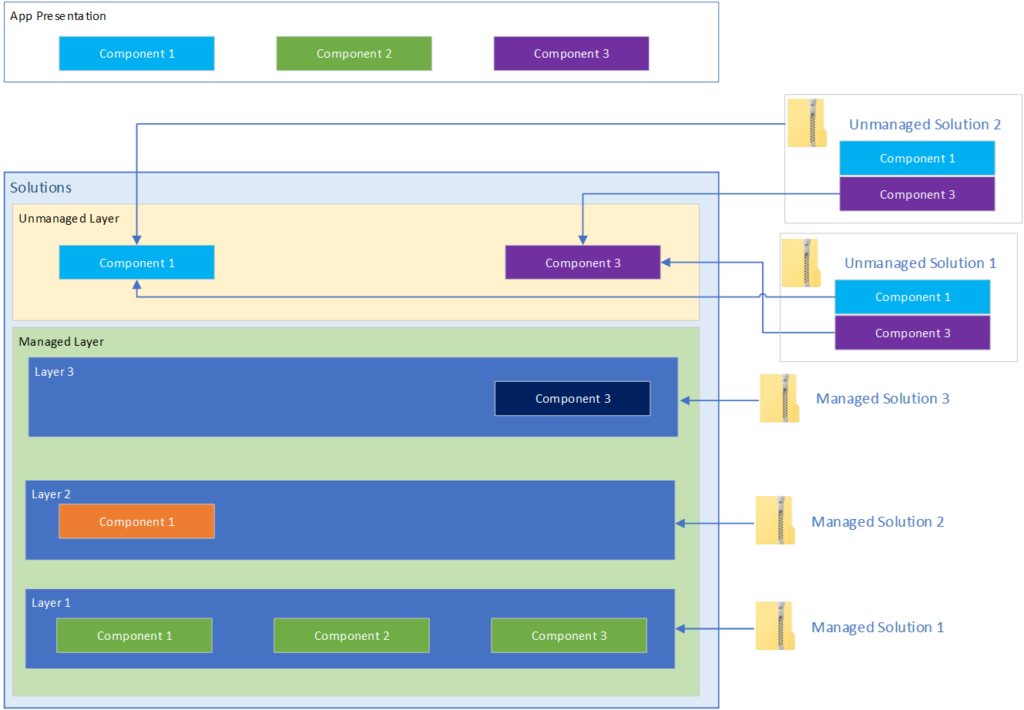
What happens when you import another unmanaged solution?
As components are only referenced in the unmanaged layer, when you add a new unmanaged solution that contains components that also exist in other unmanaged solutions, the newly imported solution configuration will overwrite the config in the unmanaged layer.
In addition, all unmanaged solutions that reference that component will automatically be updated.
Deleting unmanaged solutions
When you delete an unmanaged solution, the configuration remains in the unmanaged layer as it was only ever referenced in an unmanaged solution.
The unmanaged solutions are deleted but the configuration remains.
Deleting Managed Solutions
If you delete a managed solution, the configuration goes with it, and the principal of highest layer wins will apply.
Conclusion
Unmanaged layers can be a major source of frustration for Power Platform developers. But if you understand how they work, and know how to identify and remove them, you can save yourself a lot of time and headache.
For a long time, I’ve been a skeptic about AI-driven development. Sure I’ve tried GitHub Copilot for a few small things there and there, like a PCF control for a demo I was doing at a conference. But even with that, my inner skeptic has been a loud and persistent presence in my AI journey.
One doesn’t have to look further than message boards and comment sections to see the critics warning that the end result of these tools is often garbage. (LinkedIn being the exception)
They argue that developers spend more time reviewing and fixing buggy, AI-generated code than it would have taken to write it from scratch. Plus there’s the existential and ego part of it that scares me a bit. If these tools are as good as they say they are, uninitiated or lagging developers like me are in trouble. The reality today is we either learn or get left behind.
Holding onto that healthy dose of skepticism and my bruised ego, I decided to see for myself if these tools had matured beyond simple novelties. And the one screamed most often from the rooftops was Claude Code.
Like many, I have a backlog of personal projects. Web applications I’ve envisioned but never quite found the time to build manually. When I decided to dive into Claude Code, I didn’t want to start with a trivial “Hello, World!” My goal was ambitious: to replace a well loved but tedious spreadsheet, a cash flow forecasting spreadsheet for my consulting business, with a fully-fledged, modern web application.
Jumping Right In: A Full-Scale Project
My approach was direct: I fed Claude Code the functional requirements of the entire application right out of the gate.
I wanted to see if it could handle the complexity of taking a high-level concept and translating it into a working solution. What I discovered was Claude’s surprisingly collaborative “planning mode.”
Instead of simply generating code based on my initial prompt, I was surprised to see that Claude was more interactive than I thought. It presented me with a tabbed list of questions, guiding me through architectural decisions like the technology stack and database choices. I could select from its suggestions or provide my own responses. This process felt less like giving commands and more like co-designing the application. I could push back, Claude could push back. It seemed a healthy give and take.
Given my familiarity, I opted for a .NET Core backend and a React/Vite frontend, paired with a PostgreSQL database. Once all the decisions were made and I approved the refined plan, it was time for implementation.
Claude Code Setup
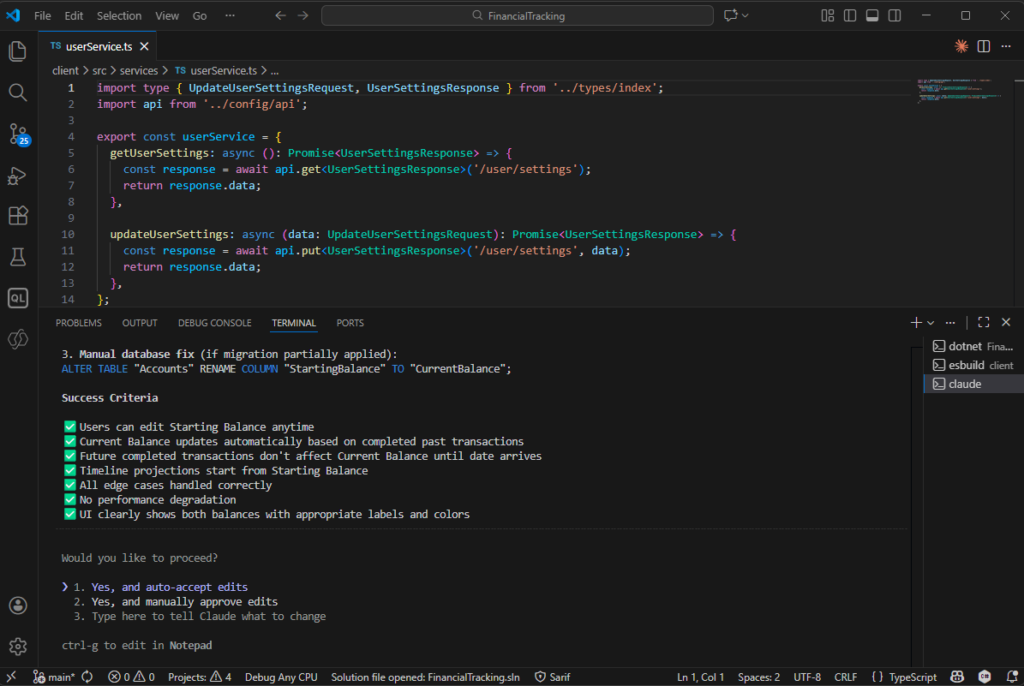
There are a few ways to run Claude Code, but I opted for the Command Line interface via VS Code for a few reasons:
The availability of planning mode (apparently it is not available in the UI app)
Familiarity – it feels more like developing in the terminal
Features – the ability to see session capacity remaining, for example.
The Iterative Build: Backend First, Then Frontend
The implementation unfolded in a systematic way. Claude Code began by scaffolding the basic project structure: empty .NET Core projects for the API and a React/Vite project for the frontend.
It then moved to the data layer, leveraging .NET Entity Framework to create a migration for the PostgreSQL database. As the API functionality was built out, Claude adopted an interactive testing approach. It would generate new endpoints and then prompt me to test them via Swagger, ensuring that each piece was working as expected before moving on.
The frontend development followed a similar iterative pattern. Claude generated full pages, complete with React routing, TypeScript types, authentication contexts, and service integrations. The workflow involved a continuous loop: Claude would ask for input, make changes, and I would validate them directly in the browser.
All the while, I was able to fold laundry in between prompts and thinking and testing. What an age.
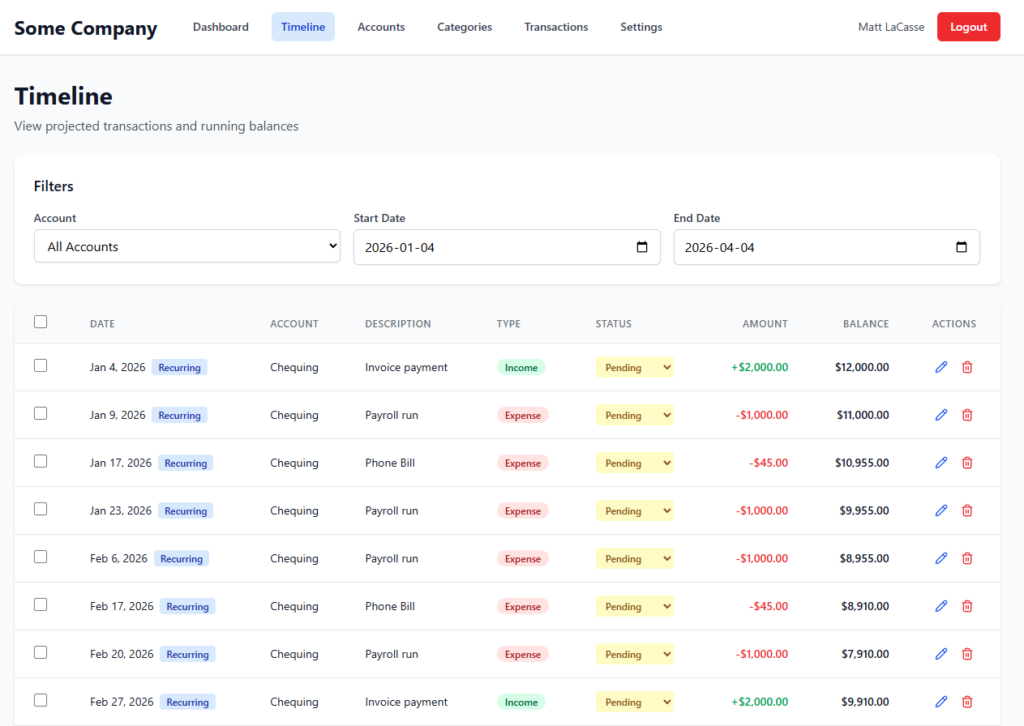
RIP My spreadsheet: Behold the Transaction Timeline!
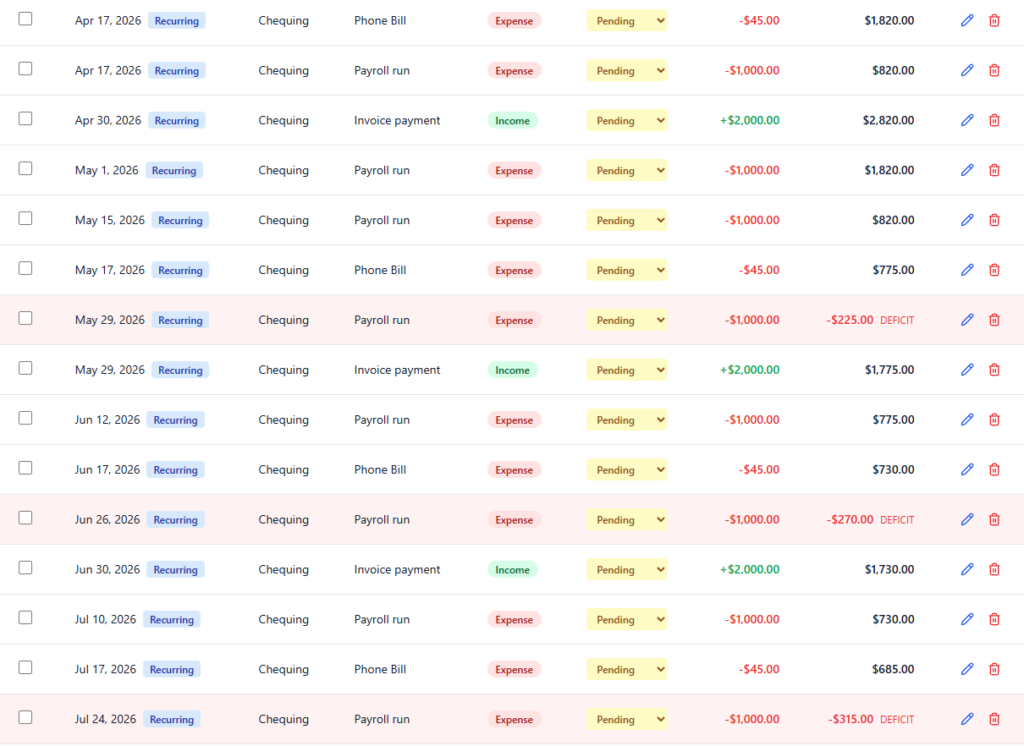
While the initial version of the app was “bare bones,” it laid a solid foundation. The real breakthrough, my “aha!” moment, came after many iterations when we (jeez, I’m speaking like it’s a coworker now) built the transaction timeline.
This feature allows me to see a list of all upcoming transactions and, crucially, what my account balance will be after each transaction completes. It’s like a bank statement that includes future activity, providing a proactive view of my cash flow weeks or months ahead.
It’s been around for many years, but I’m not going to miss that spreadsheet after seeing this.
Lessons Learned and Frustrations
My biggest lesson learned was the importance of detail in the initial prompt, and in all subsequent interactions. While Claude’s planning mode is excellent, I realized there were many functional details I knew I wanted but hadn’t explicitly specified upfront. More detailed initial prompts would have streamlined the planning phase even further.
On the flip side, not everything was seamless. One frustrating bug I encountered was an issue within Claude Code itself: the terminal window would occasionally get stuck in an infinite scroll, which disrupted the workflow and if stared at for long enough, could give you a headache. Hopefully help is on the way for that soon.
Despite these minor hiccups, my first experience with Claude Code was overwhelmingly positive. The ability to articulate a vision and see a full-stack web application emerge within 24 hours was nothing short of sorcery.
However, it’s clear that this, or any of these tools, are only as good as the prompts you provide and the person using it. It’s a powerful partner, but it requires a knowledgeable person in the driver’s seat who can guide it, validate its work, and understand the underlying code and infrastructure.
For those willing to collaborate, it can bring projects to life with incredible speed.
Run the following command: Get-AdminFlowAtRiskOfSuspension -EnvironmentName <your environment guid>
Overview
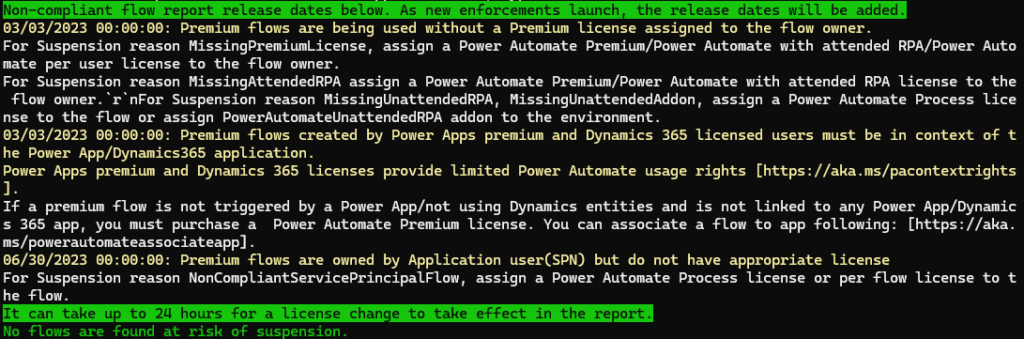
The PowerApps Administration PowerShell module includes a handy little tool to ensure your Power Automate flows are in compliance with licensing requirements. When run, the command will indicate any flows that meet the following non-compliance scenarios:
Premium flows are being used without a Premium license assigned to the flow owner.
Premium flows created by Power Apps premium and Dynamics 365 licensed users must be in context of the Power App/Dynamics365 application.
Premium flows are owned by Application user(SPN) but do not have appropriate license
Detailed Steps
Install the Power Apps Administration PowerShell Module
Open a PowerShell window as administrator, and install the module:
Sometimes you find yourself in the wrong place at the wrong time. No, this was not rain at a picnic, but rather an unfortunate intersection of the early days of a preview feature and full steam ahead development.
In reality, the following may only help a small percentage of folks, who through bad timing and luck, find themselves in a similar situation. But when there are zero Google results for the error message, it’s probably worth writing about.
The Recycle Bin
The Recycle Bin is a great new feature of Power Platform that will undoubtedly help roll back some accidental deletion of records.
Still in preview, this feature seems to be enabled in many environments. Supporting this new feature are a couple of components. One is a new table (Deleted Record Reference), and 1:N relationships on all tables where the feature is enabled(xyx_tablename_DeletedItemReferences).
The problem
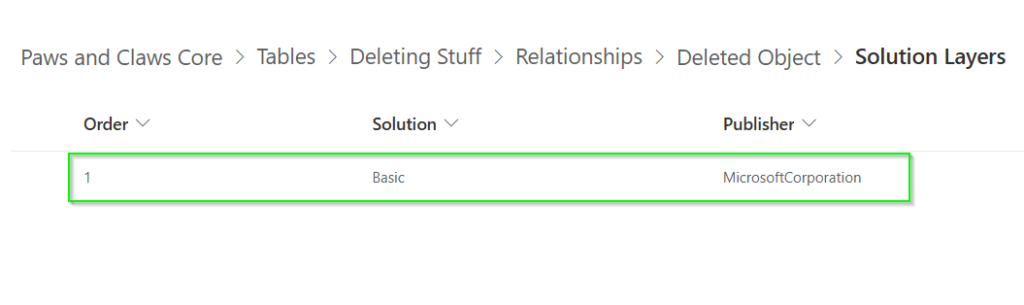
As of the time of writing, when enabling the recycle bin on a new or existing table, 1:N relationships are added between the new table and the Deleted Record Reference table. Those relationships live in a managed layer, in a solution called Basic.
Screenshot of the solution layers for the xyz_tablename_DeletedItemReference relationship as of December 10, 2024.
However, nearer the beginning of the preview window, there is evidence in some environments that the relationships were instead added to the unmanaged layer. In our case, they were also added to our unmanaged solution. The mechanism by which they were added to the solution, in our case, is up for debate. My best theory is that it was added because we had Include All Assets selected for our table in the solution. But I cannot discredit the possibility that it may have been added manually, be it accidentally or on purpose. Ultimately, it doesn’t matter.
The unmanaged solution with this relationship was exported as managed and brought into a new environment.
The problem surfaced when trying to do a managed solution deployment with the relationship removed. On deployment, we were presented with the following error message:
Entity Relationship: xyx_tablename_DeletedItemReferences Cannot be deleted since it is not a custom entity relationship
As previously mentioned, our managed solution had the relationship between one of our tables and the Deleted Record Reference.
Somehow, for one of our tables, this became the only reference for this relationship in the target environment. The “Basic” layer mentioned above does not exist in the target environment. So here is the conundrum – how do you remove a relationship from a solution in which it does not belong, but where the “proper” layer does not exist?
Resolution
When all else fails, turn it off, and turn it back on again
There were a lot of failed attempts to resolve the issue, but ultimately, the resolution was quite simple. If you turn off the Recycle Bin feature in the environment, and let the background processes do what they have to do to to disable the feature (give it like 20 minutes), you can then update your solutions which no longer contain the relationship, and the relationship will be removed from the managed layers.